Chairs I do adore… for some reason, as I was doing this project, I kept singing about my kitchen chairs to the tune of a little old-school Jay-Z. Why did that pop into my head? Why not.
It all started when Maria brought over a nice blue area rug for Sarah and I because Irie had started acting like a spaz and scrabbling around on the slick floors. For some reason, as soon as I put the rug down, I noticed how ugly our chair cushions were in a way I never had before.
Yeah. Ew. Sarah and I never expected to stay in this rental house as long as we have, so we didn’t originally put a ton of thought into things like our furniture matching or even looking that great (hey, it’s functional). However, that lovely blue rug brought to light another excellent opportunity to get the brown out. That sounds wrong. I just mean everything is brown in this house.
Anyway, a couple of yards of fabric from Walmart (yeah, wasn’t expecting that super-score) and a date with my staple gun led to this!
Voila! They’re not perfect, but they look pretty darn good, especially since I’ve never reupholstered rounded cushions before. That was a little tricky, but it still only took about an hour and a half to do all four, and that was while semi-distracted by watching The Bachelor. Here’s the full view of the before-and-after:
I’m super happy with them. They add some much needed not-brown to our kitchen area and they also make our weird copper table base look really cool with the blue rug! Y’all know how much I love a good blue and brown combo.
The table runner is also light blue, even though it looks blown-out and white in this photo, so it ties in nicely. Just call me Suzy Homemaker. And Irie loves the new rug so much that he wouldn’t allow the picture to be taken without him.
In other home updates, I spent a full afternoon scouring all the thrift stores on the Outer Banks in hopes of trading out The Tiniest Coffee Table in the World (it’s capitalized because I’m pretty sure it actually holds that title in the Guinness Book). Aaand… success! Found this beauty for $7.99:
The top is a little scuffed in places but I don’t mind. I think it’s pretty cool. And just for a little size comparison so you can see how necessary this change-up was…
That was the old coffee table. Tiny. And once again, my trusty furniture model wanted to make an appearance in the lower left.
I felt very accomplished after such a successful home improvement week. It was one of those moments of “I am sort of actually doing okay at being an adult!” Those moments don’t just come along all the time, so I’ll take ‘em when they do.
Happy Thursday! I have an exciting surprise for you today. We’re switching things up ‘round these parts, and today I’m going to sit back, relax, and let the lovely Lauren take over the blog! Lauren’s blog is great place to visit for amazing international recipes or creative crafty stuff, and she’s here to share an example of the latter today.
Now, we all know I love Pinterest. I have an entire pinboard devoted to crafty DIY projects that I’d love to attempt… but how many have I actually done? One. The cool thing about Lauren is that she actually does these crafty DIY projects! Here’s a super cool one she made recently – since I love books and reading, too, I was pumped when she offered to share! Enjoy!
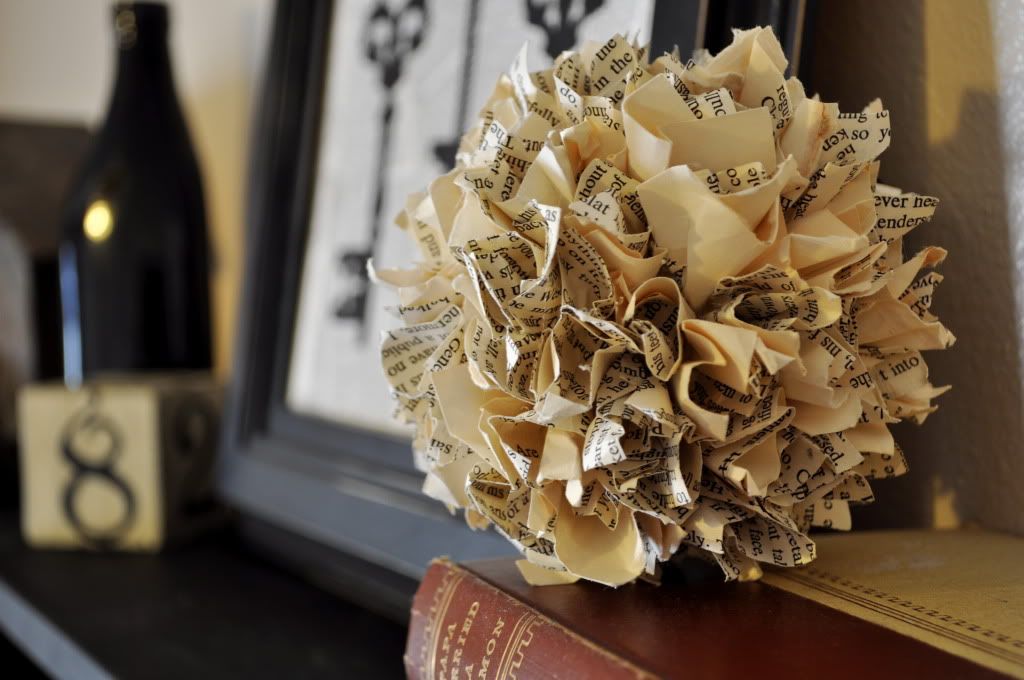
Hi there! I’m Lauren from www.aroundtheworldfood.com and I get the honor of guest blogging today. Since my blog is typically geared toward food and culture (and sometimes DIY crafts that are loosely related to travel), I get the opportunity to share a more crafty project on Julie’s blog – how to make vintage book paper balls. Now that I think about it, you could make these paper balls out of old maps too!
DIY Vintage Book Paper Balls
Supplies:
A vintage book you aren’t scared to cut up (I scored mine for 50 cents at a thrift store. Side note: No matter how cheap the book is, there’s something that feels slightly sacrilegious about cutting up a book. Try not to think about it!)
Styrofoam craft balls
Hot glue gun and glue sticks
Pencil
Scissors
Ruler
Directions:
1. Outline a square on the book paper. The size of the square will depend on how big you want the final vintage book paper balls to be. I made my squares 4″x4″. Don’t worry about cutting each square out individually. I would trace a square on the top page and cut as thick into the book as I could to save time.
2. Fold one of the square pieces around the eraser of a pencil and scrunch the paper up as tightly as you can.
3. Add hot glue to the bottom of the paper.
4. Immediately place the paper on the Styrofoam ball and hold until the hot glue has cooled and the paper is held in place. This usually took about 30 seconds to 1 minute.
5. Keep repeating until the entire ball is covered. You may have to go back and fill in any bare areas until it looks as full as you want.
I made three different sizes of vintage paper balls by using different sized Styrofoam balls and different sized paper squares. I keep mine on my DIY barn beam ledge next to some vintage looking books.
Here’s how my whole barn beam ledge looks with all of my accessories! Take a look at my vintage postage stamp monogram tutorial.
Lauren is a twenties-something Kansas Citian and blogger at www.aroundtheworldfood.com. Her hobbies include traveling all over the world (whenever possible), fixing up her 60 year old house, scuba diving, aspiring to be on The Amazing Race, and eating yummy Chinese food while watching a good movie.
The time to take the 2,223 pictures I took (yup, no joke) during my semester in New Zealand and turn them from a giant space-sucker on my computer into something that will allow me to actually enjoy them.
As much as I love taking pictures (as the however-many gigs on my hard drive and the giant Tupperware of prints under my bed can attest), I’m not that great at doing anything useful with them. I’ve always had very ambitious goals of scrapbooking/photo album-ing my whole life… but you can probably guess how many of those I’ve actually made…
Three! You were going to guess zero, weren’t you? Come on, give me a little credit… anyway, I have made a pretty cool scrapbook (yes, they’re very quaint) for each of the major travels I’ve taken: Panama, France, and Australia. It worked out pretty perfectly for these trips: each was 2-3 weeks long and left me with 500 photos max (and I definitely didn’t print and include all of them).
That puffy pink coat with fake fur trim was a great choice, 16-year-old Julie.
When it came to doing something with my New Zealand pictures, this formula obviously wasn’t going to work. Five months in the most incredible country on Earth simply left me with wayyy too many photos, even considering the number that wouldn’t make the final cut. I know there are plenty of modern ways to enjoy your photos in their digital state (e-albums, slideshows, etc.), but I guess I’m old-fashioned in that I want something big and glossy and coffee-table-worthy that I can flip through at my leisure while wearing a smoking jacket and sitting in a leather recliner.
One possibility was to break down my trip into manageable segments that could each be their own scrapbook: life in Christchurch, South Island roadtrip, North Island roadtrip, uni & friends, etc… but that would be more than even my sturdy little coffee table could handle. Plus, that many paving stone sized scrapbooks wouldn’t really accomplish the goal of concisely and effectively displaying all my photos.
Just when I thought all was lost, I found out about these nifty photo book things. You can create them online, have them printed and bound, and shipped right to your door. Actually, I should have thought of this earlier, since my brother and I created one for our parents last Christmas, but the number of photos we used for that project was so much smaller than what I’m dealing with for NZ that it didn’t cross my mind as a similar undertaking.
Anyway, I really got the idea again from this post on Young House Love. Ooh those are some swanky looking photo books, eh? They seemed to have a lot of pros for making a photo book through MyPublisher, like they did, including:
A 600-photo, 100-page book that ended up being about half an inch thick
Really high quality printing
Frequent promotions to bring down the price
Lots of creative control over the layout of your book
So after that vote of confidence from my BFFs John and Sherry (nope, false, I’m just a creep), I was pretty much going banana sandwich at the thought of having a b-e-a-utiful shiny New Zealand photo book through MyPublisher in my arms to hug and hold in just a couple of weeks. But then I figured it would be good to look around and just make sure this was the best option, and I found out about Blurb.
For comparison’s sake, or if you’re in the market for a sweet as photo book of your own, here are the sites for MyPublisher and Blurb (side note: is it bad that I got completely sidetracked by the picture of the Royal Wedding photo book on the MyPublisher website and considered ditching my whole project and just buying that one? I can’t help it. They’re just so gosh darn classy.)
Anyway, there were definitely some clear pros to Blurb as opposed to MP:
More options for size and shape of book
No 100-page limit
Less expensive overall
I know, that makes it sound like no contest. But here are the main reasons I’m still hung up on using MP: 1) they sent me a coupon for 50% off my first book, which pretty much negates the price difference between the two websites, 2) a bit of Google searching turned up the conclusion that MP print quality is better than Blurb, and 3) MyPublisher is the YHL-approved option.
What to do, what to do? I found this very thorough review and comparison of these two and other photo book websites, but unfortunately, it’s a year and half old, with only a few updates… so I’m not sure I should make my whole decision based on that.
So, any words of wisdom? Have any of you actually made photo books through either of these sites (or other ones) and ended up with any conclusive evidence to share? Or can you make better sense than I can of the reviews that are out there? Any and all advice is appreciated. This is definitely something I’m willing to spend money on, especially considering that printing hundreds of digital photos and purchasing materials to make my own scrapbook would cost far more than either photo book option, but I only want to do it once and I want to be really happy with the result… after all, these pictures are the highlight of my life thus far.
I realize that the pictures in this blog post give the impression that I primarily hang out on snowy mountains… which is ironic, since I live at the beach.


